
In the U.S., most homes depend on HVAC systems to stay comfortable year-round, but these systems can fail during extreme temperatures, creating dangerous conditions and leading to expensive repairs or even full replacements. From my own experience working on home units, I’ve seen how delayed or improper preventive maintenance (PM) often causes breakdowns that could have been avoided through scheduling regular inspections. By keeping your system running efficiently, you’re not just reducing the risk of costly issues you’re also ensuring comfort when it matters most. This guide will cover everything you need to know about HVAC inspections and provide a free checklist download to help you stay on top of maintenance tasks like a pro.
How to Use an HVAC Inspection Checklist
By recording observations, taking measurements, and reviewing components, you can identify potential and even major issues early. This document is used to catch problems before they grow, ensuring the system continues to run well in various conditions. Through years of experience, I’ve seen how a detailed process ensures reliability and comfort while helping professionals understand where improvements are needed for better long-term performance.
What is an HVAC Check?
Think of an HVAC Inspection like a visit to the doctor for your system — a quick physical that helps catch potential issues early before they grow into expensive problems. During this routine checkup, a trained inspector performs regular inspections to verify your heating and cooling systems are working efficiently and safely.
Just as your doctor’s checkup reveals what’s going on inside your body, an HVAC checkup reveals hidden troubles in your unit. From my own experience maintaining systems, I’ve seen how a small check can prevent big breakdowns later. The inspector may recommend minor fixes to address any early signs of trouble, ensuring your HVAC keeps running strong year-round.
HVAC Inspection Checklists for Different Systems:
- Air conditioner inspection
- Heat pump inspection
- Ductless mini split inspection
- Gas furnace inspection
- Electric furnace inspection
- Hot water tank inspection
- Indoor HVAC inspection
- Outdoor HVAC inspection
Air Conditioner Inspection
When I first started doing HVAC Inspection system checks, I realized that a good air conditioner inspection isn’t just about looking — it’s about understanding how each part works together. Below is a simple and complete checklist I use to make sure every AC is working properly and ready for the season.
- Check the outdoor condensing unit for any dirt or debris buildup that may block airflow. A clean condenser coil improves cooling performance.
- Look over the condenser and coil for signs of damage or corrosion. This helps prevent costly maintenance or repair later.
- Inspect the evaporator and blower assembly inside. Make sure the blower speed is set correctly to balance air flow through the ducts.
- Examine all refrigerant lines carefully for leaks, damage, or insulation wear. Accurate superheat and subcooling readings ensure the refrigerant charge is correct.
- Clean the condensate drain pan and drain line to prevent clogs or water overflow. This keeps humidity under control.
- Test all air registers and ducts for cleanliness. Dust and blockages reduce air flow and efficiency.
- Check the electrical components — tighten any loose or damaged connections inside the control panel.
- Measure equipment voltage and verify both suction and discharge pressure to confirm proper refrigerant cycle operation.
- Inspect belts for wear and tightness in the blower assembly. A slipping belt can cause uneven cooling.
- Record supply and return static pressure readings to ensure the system’s airflow is balanced.
- Verify the thermostat, sensors, and control panel are responding to temperatures accurately.
- Lastly, run the HVAC system through a full cycle to ensure everything is working properly, from start-up to shut-down.
Over the years, I’ve learned that being consistent with AC maintenance keeps systems reliable and energy-efficient. A little attention during inspection can save big on repair later — and makes your air conditioner run smoother all summer.
Heat Pump Inspection
When it comes to HVAC Inspection check maintenance, one of the most important steps is a proper heat pump inspection. From my own experience handling various systems, I’ve learned that a little attention to detail goes a long way in keeping your equipment running working properly. Here’s a quick and easy way to make sure your heat pump stays efficient and reliable:
- Inspect the coil, condenser, and evaporator — make sure they are clean, undamaged, and free from debris or ice buildup.
- Verify that the pump is elevated above the ground and away from leaky gutters or other damage risks.
- Check the outdoor unit for proper airflow; remove leaves, dirt, or obstructions that could affect the system cycle.
- Look for refrigerant leaks — use gauges to verify suction pressure, discharge pressure, superheat, and subcooling are at correct levels.
- Examine air ducts for leakage, cleanliness, and any repair needs. Make sure air registers are clear and air moves evenly between supply air and return air.
- Inspect bearings, blower motor, and blower belt for wear, tension, and tightness; lubricate all motors and belts as necessary.
- Review electrical components and control panel — tighten any loose or damaged connections, and verify correct voltage levels across the system.
- Examine the condensate drain, pan, and drain line for leaks, clogs, or damage; make sure water flows out freely.
- Test thermostat sensors and confirm temperatures are reading accurately and functional throughout the cycle.
- Measure static pressure to ensure balanced airflow and increase efficiency if needed.
- Always note any irregularities or unusual voltage, pressure, or temperature readings during your inspection.
- Before finishing, verify that every component of the HVAC system is working properly and functional according to manufacturer guidelines.
By consistently following these steps, you’ll ensure your heat pump runs smoothly, saving energy and avoiding costly breakdowns.
Ductless Mini Split Inspection
When I inspect a ductless mini split system, I like to move from the outdoor unit to the indoor housing. It keeps the HVAC system organized and ensures no part is missed during maintenance or repair work.
Outdoor Unit
- Check the housing and unit for any visible damage or rust.
- Make sure wires, pipes, and connections are secure and not loose or damaged.
- Inspect the condensing area and condenser components for dirt or blockage.
- Look for vibration in the blower, fan, or motor while the system is running.
- Examine electrical wiring, voltage, and control panel for safe operation.
- Clean any dust or debris near refrigerant lines, and check for leaks in suction or discharge lines.
- Test superheat and subcooling levels to confirm correct refrigerant pressure.
- Make sure the condensate drain pan and drain line are clear.
- Observe the supply and return air flow and note any static pressure issues.
- Verify thermostat programming, and increase or decrease temperatures to confirm system operation is working properly.
- If unusual noise or vibration is present, note it for possible repair work or further maintenance.
Indoor Unit
- Check the remote to ensure batteries are fully charged.
- Inspect the indoor housing and coil for cleanliness or damage.
- Make sure louvers and motor are functional and adjust air direction properly.
- Clean air filters, remove dust, and check for ice buildup.
- Inspect refrigerant lines and flare connections for leaks.
- Test the condensate pump and flush drain if needed to ensure it’s operational.
- Spin the blower wheel to confirm it rotates smoothly.
- Review mini split wiring, control, and voltage for safety.
- Confirm thermostat operation, and adjust programming as needed.
- Perform any required maintenance or repair work to keep the system cycle running properly.
Gas Furnace Inspection
When checking a gas furnace, I always remind beginners to start slow and pay attention to details that reveal how well the equipment is performing. Here’s a simple and practical checklist I follow for quick inspections.
- Listen for noise or vibration during operation — this often points to issues in the blower fan, blower assembly, or motor amps.
- Make sure the furnace is connected properly and all wiring is secure — look for loose or damaged connections near the control circuit, electrical components, and pressure switches.
- Check the air filter for dirt accumulation. Always clean or replace the filter to help airflow and prevent blockage or moisture accumulation inside the furnace unit.
- Inspect the heat exchanger for corrosion, cracks, or damage — this is vital for safety and efficiency.
- Test the ignitor, spark ignitor, and flame sensor. If you hear clicking but no ignition, these parts might need maintenance or repair work.
- Review the gas valve assembly and gas piping for leaks. Confirm the inlet gas pressure and outlet gas pressure are within normal range.
- Examine vent connector pipes to ensure they’re securely fastened, supported, and free from blockage or water buildup.
- Check furnace safety controls, including sensors for accuracy, and measure voltage readings to confirm proper operation.
- Inspect the ductwork for damage or air leaks, especially in supply air and return air paths. Also, monitor static pressures for balance.
- Evaluate carbon monoxide levels near the furnace area for safety. I often use a handheld CO detector to double-check readings.
- Confirm thermostat operation and programming — it should trigger the cycle furnace and show a smooth increase in temperatures during heating.
- Make sure the cover panel is installed correctly after checking inside. A missing or misaligned panel can cause airflow and safety problems.
- Look for dust, debris, or any moisture accumulation around or inside the furnace and components — regular clean routines make maintenance much easier.
- After completing all checks, cycle furnace again to ensure proper operation of all components under normal running conditions.
Electric Furnace Inspection
When HVAC Inspection checking an electric furnace, I always follow a simple step-by-step process to make sure everything is operating properly and safely. Here’s how you can do it too:
- Check the blower fan and blower motor to ensure they’re clean, undamaged, and operating properly.
- Measure the amp draw of the blower motor and heat strips to confirm both are working within safe limits.
- Inspect the air filters — if you find dust or dirt, it’s best to replace filter or clean air cleaner for better airflow.
- Examine humidifier components to confirm they’re positioned properly and free from corrosion or leaks.
- Look closely at the heat strips for any corrosion, pitting, or burns that could affect performance.
- Check heat strip amp draw and continuity to verify consistent heating operation.
- Test the sequencers to ensure they’re operating properly and cycling in the right order.
- Review all electrical components for loose, damaged, or burnt connections.
- Inspect fuses, limit switches, and thermostat terminals to make sure they respond correctly and safely.
- Confirm both low voltage and line voltage are steady and properly connected.
- Examine the ductwork for cracks, holes, or signs of gas leaks (even though electric furnaces don’t burn gas, sometimes shared systems may show nearby issues).
- Cycle furnace a few times to check for proper operation through different modes.
- If needed, perform furnace maintenance or minor repair work before restarting the unit.
I’ve learned that taking time to inspect each electrical component and connection carefully prevents expensive issues later. Keeping things clean, undamaged, and operating properly helps extend your furnace’s life and ensures comfort during cold days.
Hot Water Tank Inspection
When HVAC Inspection checking a hot water tank, even beginners can handle it with ease if they follow a simple, step-by-step approach. I’ve done this many times during HVAC maintenance visits, and trust me — with a little care, you can spot most issues before they become major repair work.
- Start by inspecting the tank closely for rust or visible leaks. A small leak can quickly turn into a bigger issue, so it’s important to act early.
- Check the piping connected to the unit — make sure all fittings are tight and not corroded.
- Verify the temperature setting on the thermostat; the system should maintain hot water output efficiently without overheating.
- Look inside the burner area if your equipment uses burners. The flame should burn cleanly — a yellow or flickering flame could mean the venting system isn’t working properly.
- Test the relief valve to confirm it’s operational. This valve helps release pressure, and it’s a key safety point.
- Review the drainage valve to ensure it’s not clogged or leaking. This helps keep the cycle of heating water smooth.
- Make sure the venting system and surrounding area are clean. Remove any dust or debris — this helps the HVAC system breathe better and perform efficiently.
- Finally, confirm the equipment runs through a full work cycle without strange noises or interruptions.
During my inspections, I’ve found that keeping everything clean and catching rust, leaks, or venting issues early keeps the tank and system working properly for years. Regular maintenance ensures your hot water stays steady, and your repair costs stay low.
Indoor HVAC Inspection
When I first started checking HVAC Inspection , I learned that a careful eye and consistent steps make all the difference. Here’s how I handle an indoor HVAC inspection the smart way:
- Check thermostat settings and ensure proper performance. Adjust the thermostat to make sure it responds quickly and maintains the right temperature.
- Inspect all filters; clean or replace if they are dirty. A clogged filter affects airflow and energy efficiency, so I never skip this step.
- Ensure systems are clean and free of damage. Dirt or visible wear often indicates deeper issues.
- Inspect and clean registers to improve airflow. It’s surprising how much dust buildup can restrict proper air circulation.
- Check furnace for any rust or damage. Look at the panels, burners, and vents—rust can mean moisture problems.
- Drain and flush all water systems to prevent buildup. Sediment buildup can reduce efficiency and cause leaks over time.
- Lubricate equipment wherever it is needed. Fans, motors, and moving parts work smoother with proper lubrication.
- Check air quality equipment such as humidifier, dehumidifier, or air purifier. These support indoor comfort and should function correctly.
- Check indoor air quality and humidity levels. Measure humidity and compare with ideal comfort ranges.
- Measure ambient temperature in different areas of the building. This helps identify uneven heating or cooling zones.
- Check water temperatures for proper heating or cooling. Ensure the system reaches set temperatures without delay.
- Listen for unusual sounds while the system is operating. Rattles, buzzing, or grinding noises often signal mechanical issues.
- Take note of maintenance or repair work that may be needed. Documenting issues early prevents major breakdowns later.
Cycle the HVAC system to confirm it is working properly. Run it through heating and cooling modes to verify smooth operation.
Outdoor HVAC Inspection
Outdoor inspections often show the first signs of trouble—especially after a storm or dusty season. Here’s how I approach an outdoor HVAC inspection with care and precision:
- Check outdoor unit for damage, rust, dents, or broken parts. Physical damage can reduce performance and efficiency.
- Check thermostat settings and system performance. Make sure the outdoor unit responds correctly to thermostat commands.
- Ensure all systems are clean and free of debris. Clear away leaves, dirt, and other obstructions around the unit.
- Confirm units are raised above ground, securely mounted, and sitting level. A tilted or unstable unit strains the compressor.
- Make sure unit is at least 2 feet away from other objects. Adequate clearance ensures proper airflow and heat exchange.
- Inspect refrigerant lines for damage or leaks. Frost or oily residue can indicate a leak that needs immediate attention.
- Check electrical components for loose or damaged connections. Tighten connections and ensure no signs of corrosion.
- Inspect condensate drain pan and drain line. Make sure water flows freely without blockages.
- Check voltage and ensure connections are secure. Fluctuating voltage can harm sensitive components.
- Inspect all components for damage, corrosion, wear, and tension. A thorough look prevents unexpected breakdowns.
- Verify temperatures increase or decrease as required. Test the cooling and heating output against expected results.
- Listen for unusual sounds during operation. Outdoor noises often reveal fan or motor issues.
- Note any HVAC maintenance or repair work required. Record everything that might need professional servicing.
Cycle HVAC system to confirm it’s operating properly. I always finish by running the system to see everything working together.
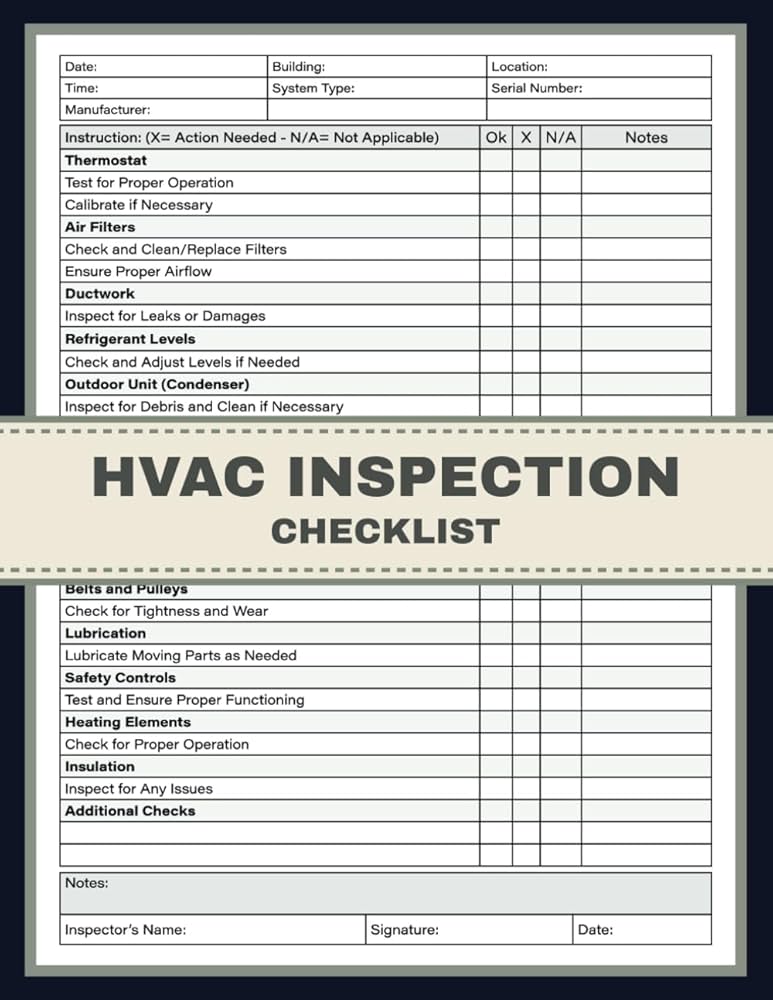
What to Include in an HVAC Inspection Checklist
When you build an HVAC inspection checklist, make it simple yet detailed enough to cover all HVAC system parts. As a technician, I’ve learned that checking every component saves time later and helps keep customers happy. Here’s how you can organize and complete your inspection tasks the right way.
- Identify customer name, contact details, building address, date of inspection, and HVAC technician title before starting the standard inspection.
- Begin by reviewing all HVAC units, including furnaces, AC units, and packaged systems.
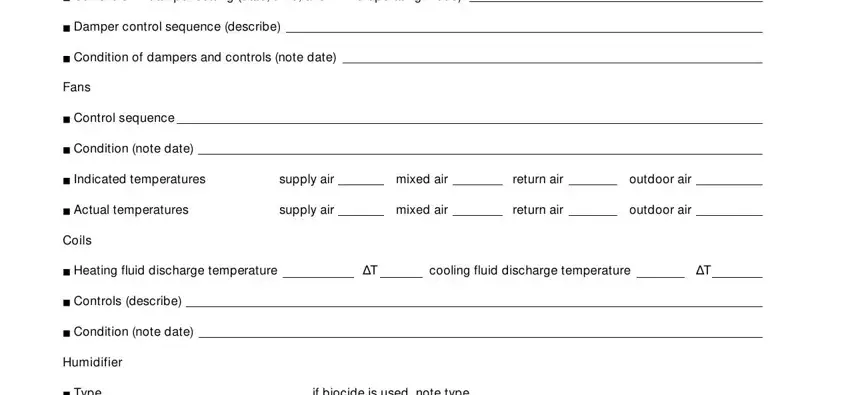
- Perform operational testing to evaluate system performance, system efficiency, and airflow quality.
- Inspect heating and cooling elements such as heat strips, spark igniters, and flame sensors to ensure safe and proper function.
- Check evaporator coils and condenser coils for dirt, dust, ice buildup, or obstructions that may reduce airflow or energy efficiency.
- Examine condensate drain lines for clogs or leaks, which can lead to damp spots, mold, or damage around the system.
- Look closely at air filters and blower assemblies. Clean or replace any filter covered in dust to prevent neglect and maintain indoor air quality.
- Check the blower, fan blades, and motor for signs of wear or imbalance to support proper operation of supporting components.
- Inspect electrical wiring, controls, and each wire connection for safety. Loose connections can lead to poor performance monitoring and unsafe operation.
- Test the thermostat to confirm it reads correctly and maintains pressure and charge levels suitable for the HVAC system.
- Examine ductwork, including upper ducts and lower ducts, for insulation, damage, or mold buildup.
- Observe for damp spots that may reduce equipment lifespan or lead to airflow issues.
- Recommend preventive maintenance actions based on your findings and note them in a written report.
- Provide a copy of the completed checklist to the customer for future reference.
- Include a recommended date for the next inspection to help track regular maintenance.
- Use HVAC apps like Jobber to log data, maintain a digital record of each inspection, and ensure smooth communication between technicians and customers.
- Always perform a safety check before closing the job to confirm reliable operation and extend equipment lifespan.
This approach keeps every inspection organized, supports preventive maintenance, and builds trust with customers through consistent system performance tracking and maintenance follow-ups.
What Happens During an HVAC Inspection?
When an HVAC inspection takes place, a skilled technician performs a detailed tune-up to make sure your system runs smoothly and safely. Based on my experience, even small maintenance steps can make a huge difference in comfort and efficiency. Here’s what usually happens during this process:
- The technician will check all controls, electrical connections, and thermostats to confirm that each component works properly.
- Refrigerant levels are measured carefully to ensure they are at the right amount for proper airflow and cooling performance.
- The expert will clean condensation drains, drip pans, and other moisture areas to prevent leaks or water buildup.
- Coils are adjusted or replaced if dirty or damaged, and fins are straightened to restore efficient air movement.
- The technician will lubricate moving parts such as belts, blower, and motors to prevent wear and extend their life.
- Surge protectors and fail-safes are evaluated to make sure your system is safe from power spikes or faults.
- The specialist may advise you on potential repair or future maintenance needs, depending on what they find.
- Air filters are checked and may be replaced if they’re clogged or dirty to keep airflow strong and healthy.
- Throughout the inspection, the technician will evaluate all essential parts, performing detailed steps to keep the system in peak condition.
Finally, they may provide tips on how to maintain the HVAC unit between service visits for better energy efficiency and longer lifespan.
Boost Efficiency with HVAC Inspection Checklists
In my years of running an HVAC Inspection business, I’ve learned that quality and control are the most essential part of keeping systems efficient and accurate. Regular inspection using detailed checklists helps improve the overall work flow, reduce errors, and increase customer trust. As demand for heating and cooling services grows, having an efficient process ensures every task meets professional quality standards while keeping operations accurate and controlled.